When you’ve spent countless hours meticulously curating your audio system, chasing that elusive perfect soundstage, sometimes the biggest leaps come from the most unexpected places. Enter the intriguing world of DIY Schumann Resonance Generator Projects, a niche but passionate pursuit for audiophiles looking to add a unique, subtle tweak to their listening experience. These homemade devices aim to recreate specific ultra-low frequencies found naturally in Earth's atmosphere, and enthusiasts claim they can profoundly influence perceived sound quality.
So, could building one of these simple circuits be your next audio adventure? Let's dive in.
At a Glance: Your DIY Schumann Resonator Journey
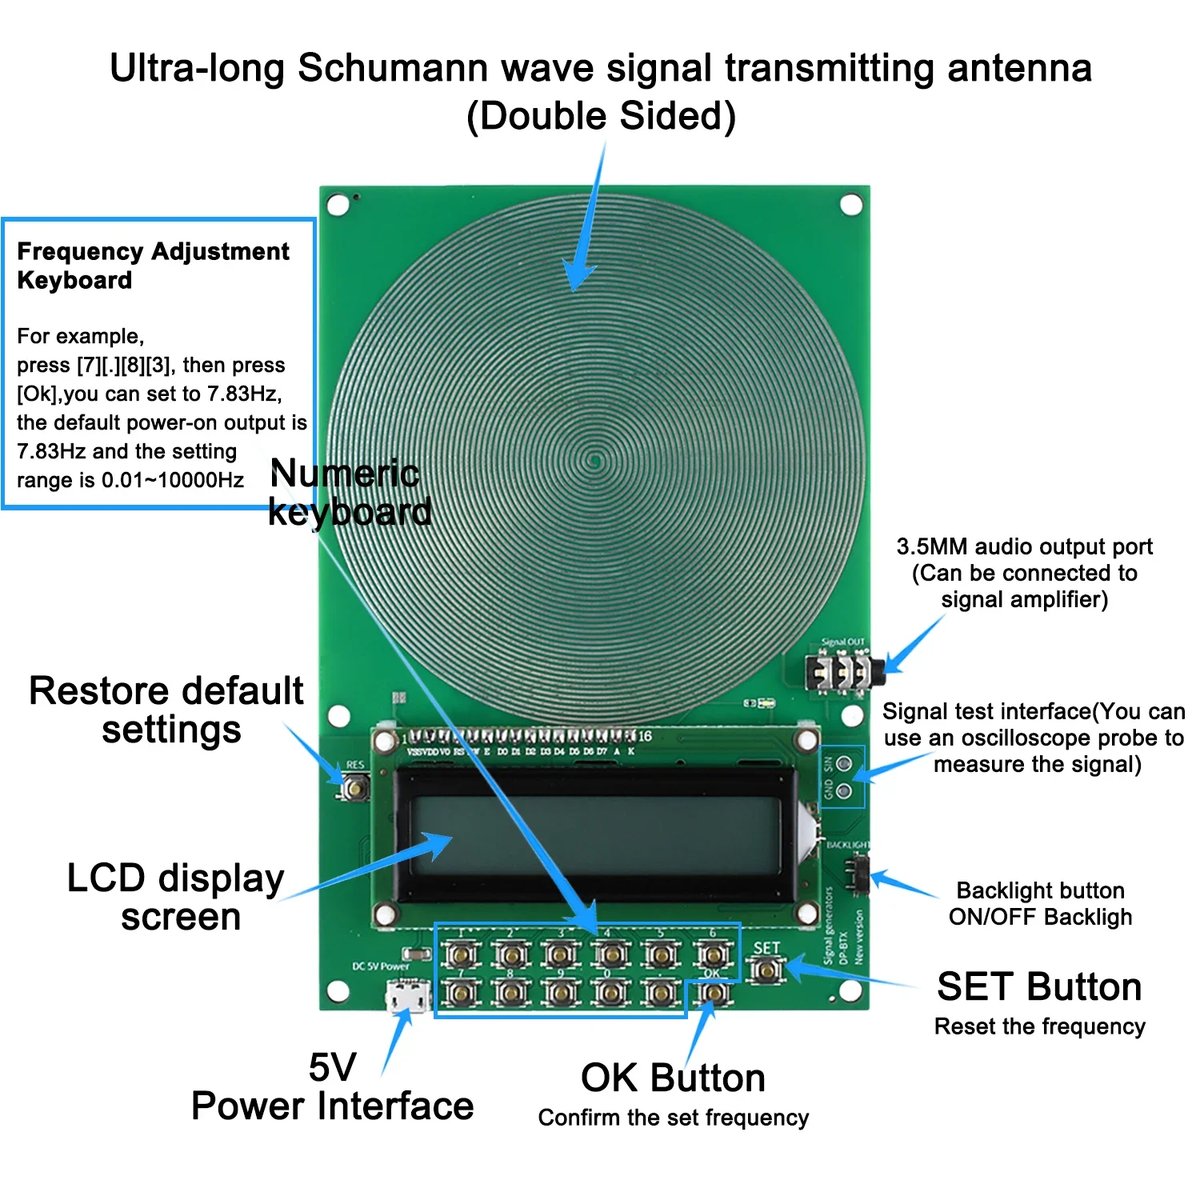
- What it is: A simple electronic circuit designed to generate extremely low-frequency (ELF) electromagnetic waves, typically at 7.83Hz, mimicking Earth's natural Schumann Resonances.
- Why build one: Significantly more affordable than commercial units (e.g., Acoustic Revive RR-77), offers a hands-on project, and provides a unique sonic tweak.
- Key components: NE555 timer IC, 22 AWG wire (for the antenna coil), 9-volt battery, 7805 voltage regulator, and a small enclosure.
- Perceived benefits: Users report a "quieter" or "darker" background, more focused imaging, improved vocal body, and an overall warmer, more engaging sound.
- Important note: Effects are subjective and often subtle, best considered as a system refinement rather than a dramatic overhaul.
- Setup: Typically placed centrally between speakers, around 1.2 meters high.
Understanding the Elusive Schumann Resonance
Before we pick up a soldering iron, let's clarify what we're actually trying to mimic. Schumann resonances are not just some audiophile folklore; they are a well-documented scientific phenomenon. They represent a set of global electromagnetic resonances, essentially spectrum peaks in the extremely low frequency (ELF) portion of Earth’s electromagnetic field spectrum.
These resonances are excited by lightning discharges within the natural "cavity" formed by the Earth’s surface and the lower boundary of the ionosphere, roughly 50 to 100 kilometers above us. Think of it like a giant, natural waveguide. The primary and most famous resonance occurs at approximately 7.83 Hz, with subsequent harmonics appearing around 14.3, 20.8, 27.3, and 33.8 Hz. While these frequencies are far below the human hearing range, the theory—and anecdotal evidence from enthusiasts—suggests their subtle electromagnetic presence can influence our perception of sound. You can learn more about Schumann resonance generators and the science behind them if you're curious about the deeper technical aspects.
The Allure of DIY: Why Build Your Own?
Commercial Schumann resonance generators, like the Acoustic Revive RR-77, can carry a hefty price tag, often in the hundreds of dollars. This high cost is a significant barrier for many audiophiles who are simply curious about the effect.
This is where DIY comes in. Enthusiasts have successfully replicated the core functionality of these devices using readily available, inexpensive components. For example, one project was inspired by the RR-77 but built entirely from salvaged parts, costing next to nothing. Another person purchased a DIY kit for a fraction of the commercial price, demonstrating the significant cost savings. The satisfaction of building it yourself, understanding how it works, and then experiencing its subtle effects is a reward in itself.
Gathering Your Tools: Essential Components for Your Project
Building a basic Schumann resonance generator is surprisingly straightforward, especially if you have some basic electronics experience. Here's what you'll typically need:
- NE555 Timer IC: This versatile integrated circuit is the brain of most DIY Schumann generators. It's used to create the precise 7.83 Hz square wave pulse.
- Resistors and Capacitors: A handful of these passive components will be needed to set the frequency of the NE555 timer. Specific values will vary based on your exact circuit design, but they are generally common, low-cost parts.
- 22 AWG Wire (or similar): This is crucial for creating the antenna coil. The gauge can vary slightly, but 22 AWG is a common choice. You'll need a decent length, as it will be doubled and coiled.
- 9-volt Battery and Connector: Provides portable power for your circuit. A standard 9V battery offers a good balance of size and longevity.
- 7805 Voltage Regulator: The NE555 typically runs on 5V, so a 7805 regulator is used to step down the 9V battery supply to a stable 5V.
- Small Project Box/Enclosure: To house your circuit and antenna, protecting them and giving your project a finished look. Wood or plastic are common choices.
- Hot Glue: Ideal for securing the antenna coil in place within the enclosure.
- Optional: LED Indicator: A small LED and current-limiting resistor can be added to show when the device is operating and, optionally, to signal low battery (e.g., by flashing when voltage drops).
- Optional: PCB (Printed Circuit Board): While you can breadboard or point-to-point wire the NE555 circuit, a small custom PCB or a universal perfboard can make assembly cleaner, especially if you're using a kit.
- Basic Tools: Soldering iron, solder, wire strippers, multimeter, screwdrivers.
Bringing it to Life: A DIY Construction Blueprint
The general process for assembling your Schumann resonance generator involves a few key steps.
1. Preparing Your Enclosure
First, decide on your enclosure. Many DIYers use a simple wooden box or a plastic project case. You'll want to drill small holes for any external components like an on/off switch or an LED indicator. Adding small rubber feet to the bottom can also help with stability and aesthetics.
2. Crafting the Antenna Coil
This is arguably the most distinctive part of the build. Take your 22 AWG wire and double it over. Starting from the center, begin forming a tight, circular coil. One builder used approximately 12 turns, hot-gluing each turn as they went to keep the coil secure and flat within the enclosure. The goal is to create a flat, spiral antenna that can be mounted horizontally.
The exact number of turns can be experimented with, but the core idea is to create a coil that efficiently radiates the ELF signal generated by the circuit. Once coiled, secure it firmly within your enclosure using hot glue or another adhesive.
3. Assembling the Electronics
This is where your NE555 IC comes into play. You'll build a standard astable multivibrator circuit around the NE555, carefully selecting resistors and capacitors to achieve a precise output frequency of 7.83 Hz. Diagrams for 555 timer circuits are widely available online and in electronics textbooks.
If you’re using a kit, this often involves populating a small PCB (Printed Circuit Board) with the NE555, resistors, capacitors, and the 7805 voltage regulator. Connect the output of your 555 circuit to the ends of your antenna coil.
4. Powering Your Resonator
For portability and simplicity, a 9-volt battery is a popular choice. Connect the 9V battery to the 7805 voltage regulator, which will provide a stable 5V to your NE555 circuit. A single 9-volt battery can power the device for a surprisingly long time – some report up to 3 days of continuous operation. If you include an LED indicator, you can wire it to flash when the battery voltage drops, giving you a convenient low-battery warning. Alternatively, you can use a wall wart power supply if you prefer not to rely on batteries.
Finding its Sweet Spot: Placement and "Run-in"
Once your Schumann resonance generator is built, placement is key for maximizing its subjective effects. Based on anecdotal reports, the most effective position is typically:
- Centered: Place the device centrally between your main stereo speakers.
- Elevated: Aim for a height of around 1.2 meters (approximately 4 feet). This could be on a dedicated stand, a shelf, or even a stack of books.
After powering it on for the first time, don't expect immediate, dramatic changes. Many users report a "run-in" period of about an hour for the unit to stabilize at its desired frequency and for its effects to become noticeable. Think of it like breaking in new audio components; the system (and your ears) needs time to adjust.
The Sonic Transformation: What Audiophiles Report
The effects of a Schumann resonance generator are widely described as subtle but undeniably positive by those who experience them. These aren't "night and day" differences, but rather refinements that enhance the overall listening experience.
Users often report:
- A Quieter, Darker Background: The perceived noise floor of the recording seems to drop, making the music emerge from a deeper, blacker silence. This can lead to a more relaxed and immersive listening experience, allowing for longer sessions without fatigue.
- More Focused Imaging: Instruments and vocals within the soundstage appear more precisely placed and stable, creating a clearer, more holographic presentation.
- Increased Vocal Body: Vocals gain more weight, presence, and naturalness, making singers sound more "in the room."
- A Warmer Sonic Character: The overall sound system can tilt towards a slightly warmer, more organic, and less fatiguing presentation.
- Enhanced Dynamics: While subtle, some describe an improvement in micro-dynamics, revealing more nuance in the music.
These changes, while not always significant in magnitude, are consistently described as positive. They contribute to a more enjoyable and engaging auditory journey, making your finely tuned system sound even better.
Beyond the Basics: Advanced Tweaks and Future Exploration
Once you've built and experimented with a basic 7.83 Hz generator, you might wonder what's next. Some enthusiasts look to future-proof their projects:
- Tunable Resonators: The Schumann resonances appear at multiple peaks (7.83, 14.3, 20.8, 27.3, and 33.8 Hz). A more advanced DIY project could involve building a tunable resonator. This might require a more sophisticated tone generator circuit connected to a power amplifier and a larger coil. Such a setup would allow you to target each of the five resonances individually and analyze their specific effects on sound.
- Multi-Frequency Units: Instead of a single tunable unit, you could build multiple fixed-frequency generators, each set to a different Schumann harmonic, and activate them individually or in combination.
- Enclosure Materials: Experimenting with different enclosure materials (e.g., wood, acrylic, specific metals) might also influence the device's subtle output, though this is largely unverified territory.
These advanced steps move into more experimental territory, perfect for the truly dedicated DIY audiophile who loves to tinker and explore every possible avenue for sonic improvement.
Safety First: Essential Precautions for DIY Electronics
While building a Schumann resonance generator is a relatively low-voltage project, basic safety precautions are always paramount when working with electronics:
- Soldering Safety: Always work in a well-ventilated area to avoid inhaling solder fumes. Use a fan or fume extractor. Be mindful of hot soldering irons.
- Power Handling: Double-check your wiring before applying power to prevent short circuits. Ensure correct polarity for batteries and components.
- Component Handling: Be careful with leaded components; wash your hands after handling.
- Tool Use: Use appropriate tools and ensure they are in good condition.
- Static Discharge: Take precautions against static discharge, especially when handling sensitive ICs like the NE555, though it's relatively robust.
Remember, the goal is to enhance your listening pleasure, not to create any hazards.
Is a DIY Schumann Resonator Right for Your Setup?
A DIY Schumann resonance generator isn't a magical fix for a poorly performing system. It's a refinement, a subtle enhancement best appreciated when your core audio components are already well-matched and optimized.
Consider it if:
- You're on a budget: It's a cost-effective way to experiment with these unique audio tweaks.
- You enjoy DIY projects: The satisfaction of building it yourself is a big part of the appeal.
- Your system is already good: These devices tend to polish an already excellent setup, revealing nuances rather than correcting fundamental flaws.
- You're open to subtle changes: If you're looking for dramatic shifts, you might be disappointed. If you appreciate fine-tuning, you might be delighted.
Ultimately, if you've exhausted other upgrades or are simply looking for an interesting and affordable tweak to elevate your listening experience, diving into DIY Schumann Resonance Generator Projects offers a unique path to sonic satisfaction.
Your Next Steps in Acoustic Exploration
Ready to build your own? Start by researching specific NE555 astable multivibrator circuits designed for low frequencies. Gather your components from online suppliers or local electronics stores. Join online forums or communities where other DIY audiophiles share their experiences and circuit designs.
The world of DIY audio is rich with experimentation and personal discovery. Building a Schumann resonance generator is more than just assembling a circuit; it's an invitation to listen differently, to explore the subtle layers of sound, and to personalize your sonic landscape in a truly unique way. Happy building, and happy listening!